MacCoss lab calendar instructions

The MacCoss lab now has a Google calendar for keeping track of group meeting and instrument sign-up. Everyone will have access to the lab account and can use the calendar that way. However, you may find it easier to set up your own Google account that includes the lab calendars so that you can customize the appearance as you like. The following will explain how to access the lab account, view the lab meeting schedule, and sign up for instrument time. There are also instructions for creating your own account and adding the lab calendars to your own.

Some terminology You are probably familiar with Google as a search engine, but may not be aware of other Google services. One of these is Calendar.

  • In order to use Calendar, you must have a Google account. This is different than a gmail account (if that means anything to you). All that is required is a valid email address. You could use your u.washington.edu address or another one (e.g. hotmail.com, earthlink.net).
  • The Calendar service provides two things: a set of events you wish to keep track of and a visual representation of those events.
  • Here's where the terminology is slightly confusing. A set of events is also called a calendar. These can be shared among different accounts with different levels of control.
  • A public calendar is one that is shared with the entire world.
  • A private calendar can be viewed and changed only by the owner (the account that created it) or can be shared with select accounts. The latter is how the MacCoss lab calendars will be shared.

Visit the calendar You can access the MacCoss lab calendar by logging into the lab account.

  1. Direct your web browser to www.google.com (click on the address to open a new window).
  2. Sign in by clicking the "Sign In" link in the upper-right corner of the page. The log in is maccosslab@gmail.com and the password is lclcmsms. (If you are already signed in for a different account, click on "Sign out" and then sign back in with the new address.)
  3. Click on the "Calendar" link on the left. If you don't see it, try "My Account" in the upper-right corner. (Or you may have been directed to the calendar page already.)
  4. Now you should see something like this

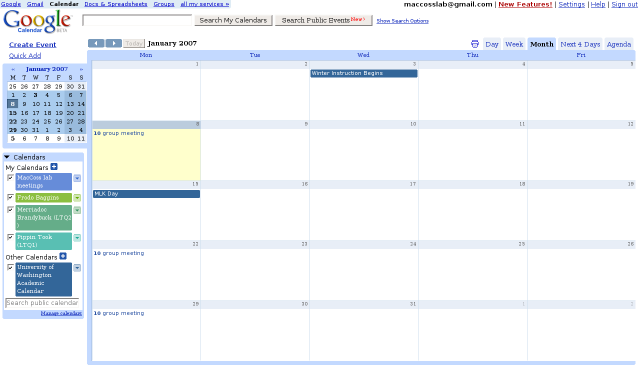
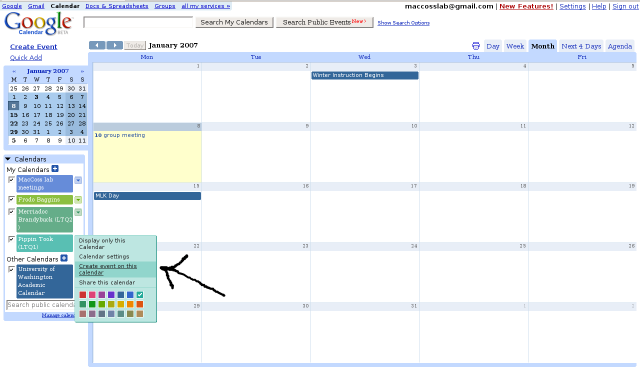
    Along the left, you'll see some boxes in different colors with text like "MacCoss lab meetings" and "Frodo Baggins". There is a different box for each calendar. We have one for meetings and one for each instrument. The check-box to the left of the name lets you display events in that calendar or hide them. The arrow to the right of the name gives you a pop-up menu for changing that calendar.

  5. The visual calendar takes up most of the screen. It may look like a monthly calendar, a weekly calendar, or a list of events for a single day. (The above image is the monthly view) You can switch views with the tabs in the upper right. You can change which days you see with the left and right arrow buttons (blue boxes with white arrows) at the upper-left of the visual calendar.
  6. You can learn more about events by clicking on them in the visual calendar. For instance, if you want to learn who is presenting this week in group meeting, make sure that the "MacCoss lab meetings" calendar is checked and click on "group meeting" for that week. If you are in month view, you will get a pop-up with some details like the time and location of group meeting. Click on "edit event details".
  7. If you were in week or day view you were already taken to this page. The main information about an event is in the tan box with headings like What, When, Where, and Description. Next to Description you'll see who is scheduled to present. More information about event details in the Signing up for instrument time section below.

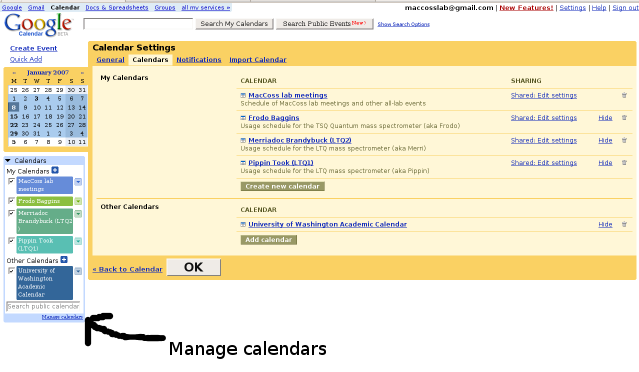
Add to your personal calendar. If you already have a Google account, you can add these calendars to your own and never have to log in to maccosslab@gmail.com again. The following steps explain how. (If you do not have an account you can create one easily.) If you didn't just complete the steps above, start by logging into the lab account and opening Calendar. (If you do not have an account you can create one easily.)

  1. Click on "Manage Calendars". It's in tiny print at the bottom of the list of calendars under the search box. It should look like this.

  2. Pick a calendar you want to add and click on "Shared: Edit settings" to the right of the name.
  3. Enter your email address (the one you use for your Google account) in the box under the words "ADD A NEW PERSON". If you selected "MacCoss lab meetings", it should look like this.

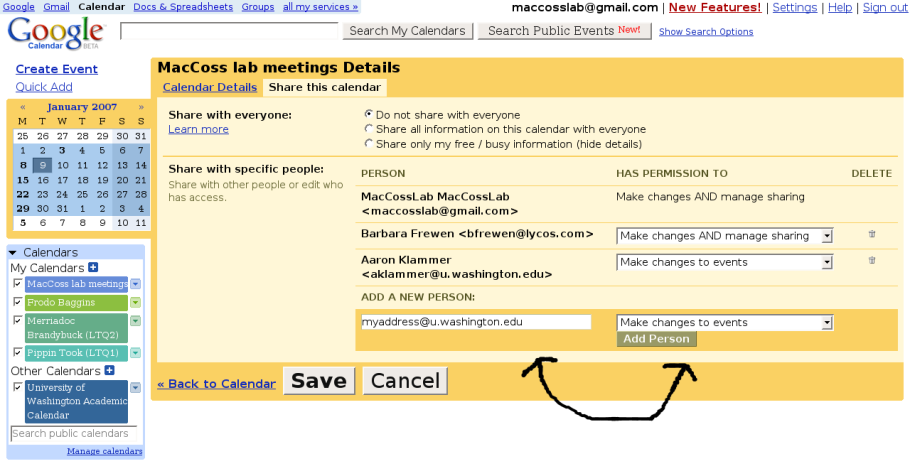
    In the drop-down box to the right, select "Manage changes to events". Now click the Save button.

  4. Repeat steps 1 through 3 for each calendar you wish to add. You'll need to add the instrument calendars to be able to sign up for time on them. Remember that after you have added a calendar, you can always choose not to view it. (See Customizing)
  5. Now if you sign out and sign back in to your personal account, you should see the new calendars.

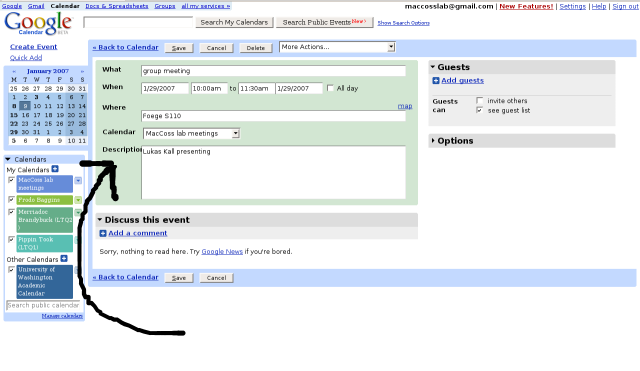
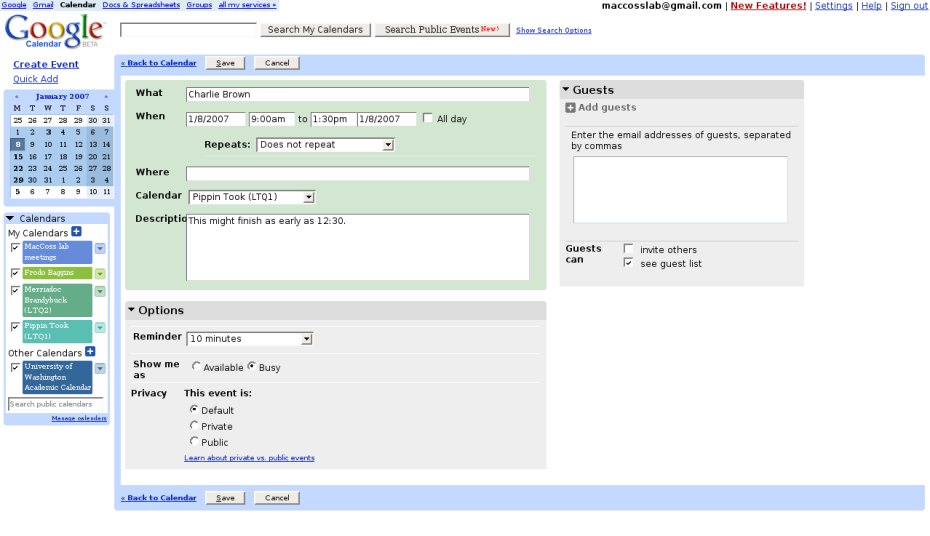
Signing up for instrument time Each entry in a calendar is called an event. To sign up for an instrument you simply create an event with your name. Here's how. You can follow these instructions either from the maccosslab@gmail.com account or your own.

  1. Select the instrument you wish to use. The list of calendars on the left of the main calendar page each has an arrow at the right. Click on the arrow and select from the pop-up menu "Create event on this calendar". (The colors may be different for you. See Customizing)

  2. Enter your name in the "What" field. Enter the start and end times you want. (Note that you can sign up for a time longer than one day by changing the second date field). Make sure that the calendar is for the instrument you want. Enter any details you would like people to know about your run. Here is what an entry might look like.

    You can also reach this screen by two other methods. You can click on the "Create Event" in the upper-left of the main calendar screen and enter in all the same data. Alternatively, you can click on the visual calendar and then click on "edit event details" in the pop-up. Be sure to change the calendar from your default to the instrument calendar.

  3. Click the Save button. After a moment, the event should appear on your visual calendar.
  4. To change or delete your sign-up time, click on the event and select "edit event details", make the changes, and click Save.

Create a new account All you need for a Google account is an email address. You can use your @u.washington.edu address or another address you may have.

  1. Direct your web browser to www.google.com (click on the address to open a new window).
  2. Start by clicking the "Sign In" link in the upper-right corner of the page. This should take you to the sign-in page.
  3. In the lower-right side of the screen, below the boxes for entering login and password, there is a link for "Create a new Google account". Click on the link.
  4. Fill in the form with your email address, password, etc. and click the I accept. Create my account. button at the bottom.
  5. You will be sent an email with instructions on how to complete the set-up.

Customizing Google has good on-line help for how to use Calendar (the "Help" link in the upper-right corner of any Calendar page). Here are a few items to get you started.